Teknologi /
Running Go and React on AWS using Lambda
This tutorial shows you how to use AWS Lambda and S3 bucket to build and deploy a Go API with a React frontend.


Part 1: Getting started
For this project I'm going with the super original name "myservice"(1).
(In the actual commits you'll see "someservice555" since myservice is taken)
Prerequisites:
Let's start off with creating the project folder and initializing a new Go project. We're also adding Gin, as it facilitates running the application both locally and in AWS Lambda.
To keep gin and routing separated from our own logic, let's create a quick routing package to handle all the Gin logic:
This will allow us to easily add new endpoints to our application without duplicating a lot of code or worrying about gin.
Our endpoint will for simplicity's sake be a simple "hello world":
We'll make this in api/hello/hello.go
We have 3 exports from our API:
- The endpoint mapping
- The request type
- The code to execute.
We also need to add a mapping and start our server:
If we start this application and call http://localhost:8080/hello we can see it successfully returns the JSON response `{"msg":"Hello!"}`
To add additional endpoints simply add new file under api\ and another `AddRoute` entry.
At the end of Step 1 you should have the following: See commit
Part 2: Adding the frontend
For our frontend we'll be using React with typescript (If you do not have npx installed, this is good time to do so)
We'll create a new project named "frontend", and add the cross-env1 and getenv2 npm packages.
We now have an empty react application running on http://localhost:3000
Let's add the integration towards our Go API.
First off we need to add our API url to package.json, changing the "start" parameter to:ace the App.tsx file with our own, adding a simple input field and a button to test our
The environmental variable REACT_APP_API will allow us to easily set the API URL depending on the different environments.
We'll get back to this later when deploying to AWS.
(Curious why it has to start with "REACT_APP_"? Read more here.)
Next up we replace the App.tsx file with our own, adding a simple input field and a button to test our API.
Open http://localhost:3000 in your browser and click the button.
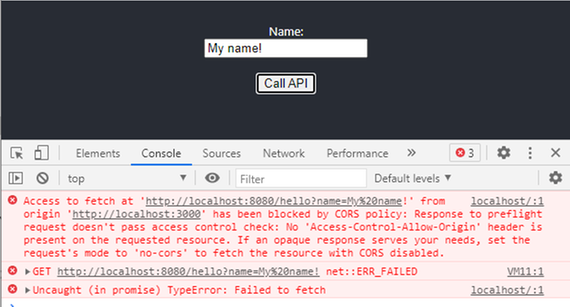
It doesn't work. Upon closer inspection in the browser developer console, we can see it's lacking CORS headers.
By adding a middleware to the API we ensure that every request gets the correct headers set.
We configure the application to look for the environmental variable called "ALLOWED_ORIGIN", which we use to specify who is allowed to call our API. In AWS this will be our S3 bucket, for local development we set it to ALLOWED_ORIGIN=http://localhost:3000 (3)
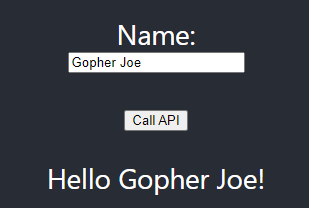
Success!
We now have a fully functional API with a frontend.
All that remains now is getting it running in AWS!
At the end of Step 2 you should have the following: See commit
Part 3: Deploying to Lambda
In order to simplify deployment and resource creation in AWS, we'll be using Serverless, which is a free command line tool that can both create, upload and deploy our API and frontend with a few simple commands.
At this point I assume you have the AWS CLI installed and have authenticated successfully.
We'll also be using serverless-finch to deploy our frontend to S3, so let's go ahead and install that as well.
Serverless uses a yaml config file to define deploys, so we start by adding serverless.yml
There's a few entries here which may need to be changed:
- service is the name of your service, in my case myservice.
- memorySize defines how much memory you need. AWS charges for usage, so let's start with the lowest of 128mb.
- ALLOWED_ORIGIN this is the environmental variable we use to set origin. We're storing this value in SSM.
- bucketName is the name of our S3 bucket where we will store the frontend. This will be created for us. If using a custom domain name, set your domain name here.
- distributionFolder this is the folder where the frontend is stored.
- functions contains the mapping for all of your endpoints.
SSM: The name we choose is unique per region, not per applicationSo it's good practise to namespace this. I've chosen `/myservice/config/allowed_origin` as the name to store in SSM.
We also need our serverless-finch configuration for S3, which we'll store in resources\s3-bucket.yml:
This is pretty boilerplate, and we won't need to change anything in this file. It reads the bucket name from serverless.yml via `${self:custom.client.bucketName}`.
Let's go ahead and install our AWS dependencies for Go:
We'll also be adding a simple script to build our application:
Makefile (Linux) / Batch script (Windows)
Take note of the `-o bin/aws`, as it's the binary we're referencing in `serverless.yml`.
It's also important that it's compiled for target=linux regardless of your local environment, as it's what AWS Lambda expects.
Now all we need to do is add endpoints in a way that Lambda understands them:
That's it, we're ready to deploy this to AWS!
In the myservice folder, run: `sls deploy --verbose`
As you can see our deploy finished successfully, and the url of our new API is "https://xh517uj5a9.execute-api.us-east-1.amazonaws.com/dev/hello"
You can also see a warning that 'ssm:/myservice/config/allowed_origin' could not be found, but we'll set that soon.
We can call the endpoint and verify that its running as expected:
And "access-control-allow-origin" is of course missing, since we've not yet set the SSM variable.
Part 4: Deploying the frontend
Now that we've deployed our backend to Lambda, and know the URL of our API, let's start with updating package.json:
Running `npm run build` should now produce a deployable build which points towards our API running in AWS Lambda.
Let's go ahead and build it now with `npm run build` inside the frontend folder.
After the build has finished, return to the main project folder (myservice) and run `sls client deploy` which will deploy out frontend project. We already defined the folder in `serverless.yml`, so it knows to look in frontend\build.
As we can see the frontend was successfully deployed to http://myservice-frontend.s3-website-us-east-1.amazonaws.com/
If we visit our website, we can see that it loads correctly, and the button obviously fails, as we've not yet set our allowed origin.
Let's finish up and set our origin with:
`aws ssm put-parameter --name /myservice/config/allowed_origin --type String --value myservice-frontend.s3-website-us-east-1.amazonaws.com`
Finally redeploy our Go API with `sls deploy`.
The website is now up and running with a fully functional API!
At the end of Step 3 and 4 you should have the following: See commit
Going forwards
Modifying the API and deploying changes:
- When modifying the Go API: Build it and redeploy with `sls deploy`.
- When modifying the frontend, run `npm run build` in the frontend folder, followed by `sls client deploy` in the project folder.
Unsure how to add more endpoints? See an example!
Gotchas / Common problems
- Your lambda function is running behind the Amazon API Gateway, and serverless is creating mappings for us in the background. If you accidentally mix up GET and POST, the API will not return "405 Method Not Allowed", instead it will return 403, usually with a JSON response referring to credentials or missing authentication tokens.
- The API Gateway has a maximum response size of 10MB, exceeding this limit will return http 502/503.
- Serverless does not by default enable gzip compression in the API Gateway. See the serverless-content-compression plugin for enabling gzip compression.
- By default the API Gateway assumes the content type is text (json/html/xml/etc) and will mangle the response if you return binary data. This can be fixed by manually setting it as binary in the API Gateway or you can try a plugin such as serverless-apigw-binary.
Links/citations:
1) Naming convention: Ideally you should avoid uppercase letters, underscores and dashes in your project name, as you'll eventually run into a cloud service which does not allow it.
2) cross-env package allows us to easily run the application on both linux and windows without changing anything.
3) getenv allows us to easily fetch environmental variables, which we'll use to get the server URL
4) How you set the environmental variable locally depends on how you're running the project.