Teknologi / 15 minutter /
Role-based access control with Quarkus and Microsoft Azure Active Directory
In this article we'll demonstrate how to connect your Quarkus application to Microsoft Azure Active Directory to authenticate and authorize users. We'll show how you can give users access to certain parts of your application by mapping Active Directory groups to application roles.

TL;DR
If you're already familiar with Azure AD and Quarkus OIDC and just want the gist of it, here's what you need to configure. Otherwise, read on below for a full tutorial. You can also check out this repository on https://github.com/kantega/quarkus-ad.
In Azure AD, create an "App registration" for your Quarkus app, and create a client secret. Then add one or more app roles, and use Azure AD > Manage > Enterprise applications > Your app > Users and roles > Add user/group to assign users and/or groups to app roles. To return profile information such as Given Name and Family Name as claims, use Azure AD > Manage > App registrations > Your app > Token configuration and add claims to the ID token.
Configure your Quarkus application by adding this to application.properties:
1# Azure AD > Admin > App registrations > Your app > Application (client) ID
2quarkus.oidc.client-id=827523e9-c5f7-410a-a6e7-8db28d7e3647
3
4# Azure AD > Admin > App registrations > Your app > Certificates & secrets > Client secrets > Value
5quarkus.oidc.credentials.secret=<not shown>
6
7# Azure AD > Admin > App registrations > Your app > Directory (tenant) ID
8quarkus.oidc.auth-server-url=https://login.microsoftonline.com/22cff3d6-9eda-4664-8d70-c7597cc1b34a/v2.0
9
10# Regular web app with server side rendering
11quarkus.oidc.application-type=web_app
12
13# Azure AD does not support redirect URIs with wildcards, so we'll use /. Remember to add http://localhost:8080
14# and the deployed URL of your webapp in Azure AD > Admin > App registrations > Your app > Redirect URIs
15quarkus.oidc.authentication.redirect-path=/
16quarkus.oidc.authentication.restore-path-after-redirect=true
17
18# Get profile and email info as claims
19quarkus.oidc.authentication.scopes=profile email
20
21# Azure AD stores your app roles in a claim called /roles, not /groups
22quarkus.oidc.roles.role-claim-path=roles
23
24# Increase logging to aid debugging
25quarkus.log.category."io.quarkus.oidc".min-level=TRACE
26quarkus.log.category."io.quarkus.oidc".level=TRACE
This might be enough to get you started. If not, read on!
The full tutorial
Create a new quarkus application using the code generation tool at code.quarkus.io. Be sure to select OpenID Connect and RESTEasy Qute. Click "Generate your application", and download the generated project as a zip file.
Decompress and open the project in your favorite IDE. You can then start the application by running ./mvnw quarkus:dev
1$ ./mvnv quarkus:dev
2
3__ ____ __ _____ ___ __ ____ ______
4--/ __ \/ / / / _ | / _ \/ //_/ / / / __/
5-/ /_/ / /_/ / __ |/ , _/ ,< / /_/ /\ \
6--\___\_\____/_/ |_/_/|_/_/|_|\____/___/
72021-10-08 14:23:46,994 INFO [io.quarkus] (Quarkus Main Thread) quarkus-ad 1.0.0-SNAPSHOT on JVM (powered by Quarkus 2.3.0.Final) started in 124.864s. Listening on: http://localhost:8080
82021-10-08 14:23:46,996 INFO [io.quarkus] (Quarkus Main Thread) Profile dev activated. Live Coding activated.
92021-10-08 14:23:47,003 INFO [io.quarkus] (Quarkus Main Thread) Installed features: [cdi, oidc, qute, resteasy, resteasy-qute, security, smallrye-context-propagation, vertx]
Quarkus will generate a class called SomePage which has a JAX-RS endpoint mapped to /some-page
1@Path("/some-page")
2public class SomePage {
3 private final Template page;
4
5 public SomePage(Template page) {
6 this.page = requireNonNull(page, "page is required");
7 }
8
9 @GET
10 @Produces(MediaType.TEXT_HTML)
11 public TemplateInstance get(@QueryParam("name") String name) {
12 return page.data("name", name);
13 }
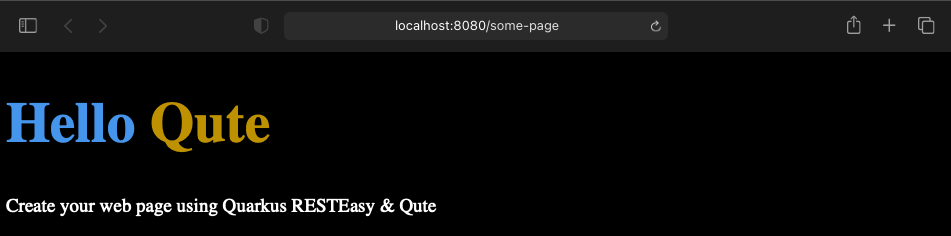
14}Open http://localhost:8080/some-page and you should see the following page:
Authentication with OpenID Connect and Azure Active Directory
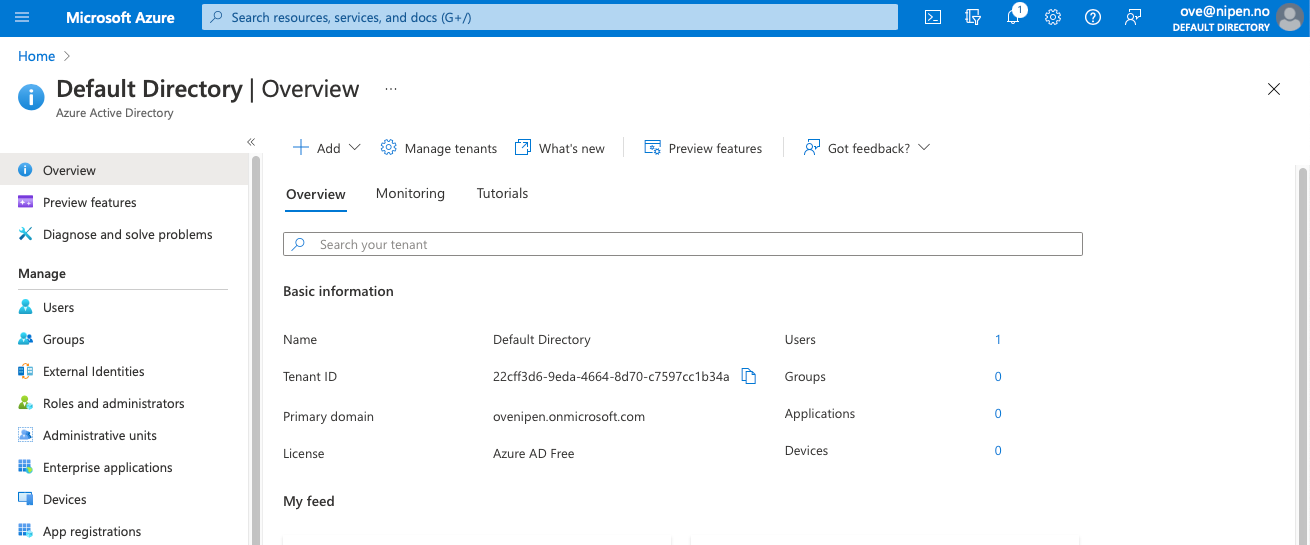
To enable OIDC within Active Directory, you need to register your application in the Azure portal. Log in to https://portal.azure.com. You can use your personal email address or your github account to log in. If you do, an empty Active Directory is set up for you. If you log in with your work account, you may find that there is already an Active Directory set up, which you may or may not have access to configuring.
After logging in, navigate to the Azure Active Directory control panel using the menu in the top-left corner. It should look something like this:
Quarkus needs three parameters to integrate with Active Directory. These are:
1quarkus.oidc.client-id
2quarkus.oidc.credentials.secret
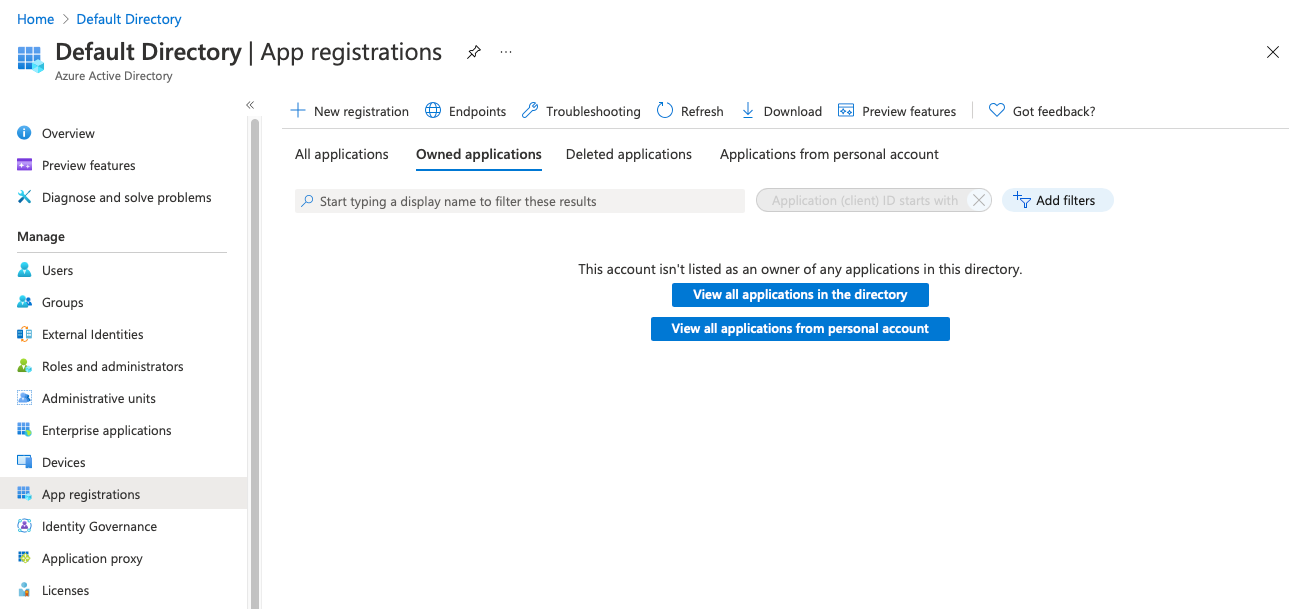
3quarkus.oidc.auth-server-urlTo create the values for these parameters, we first need to register our application with Azure AD. Navigate to Manage/App registrations in the menu on the left.
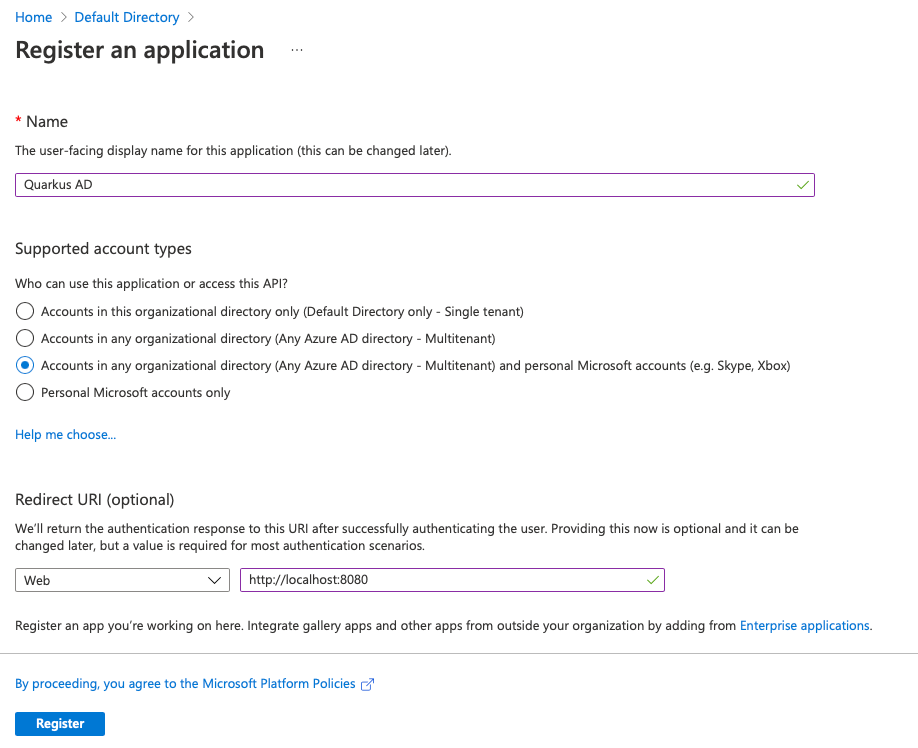
Select New registration, and fill inn the form. Use Quarkus AD as the application name. We'll also allow users from any organizational directory to log in.
Important: Register http://localhost:8080 as a redirect URI. As part of the logon process, users will be redirected from our application to Azure AD for authentication. We want to send them back to our application afterwards. Azure AD will not allow any redirect URLs that are not registered. When you deploy your application to another server (not localhost), you will need to add that URL as well. We'll come back to this later. For now, we'll stick with http://localhost:8080, since this will allow us to test the login flow.
Click register. You should now be able to find the app registration by navigating to Manage/App registrations in the menu on the left.
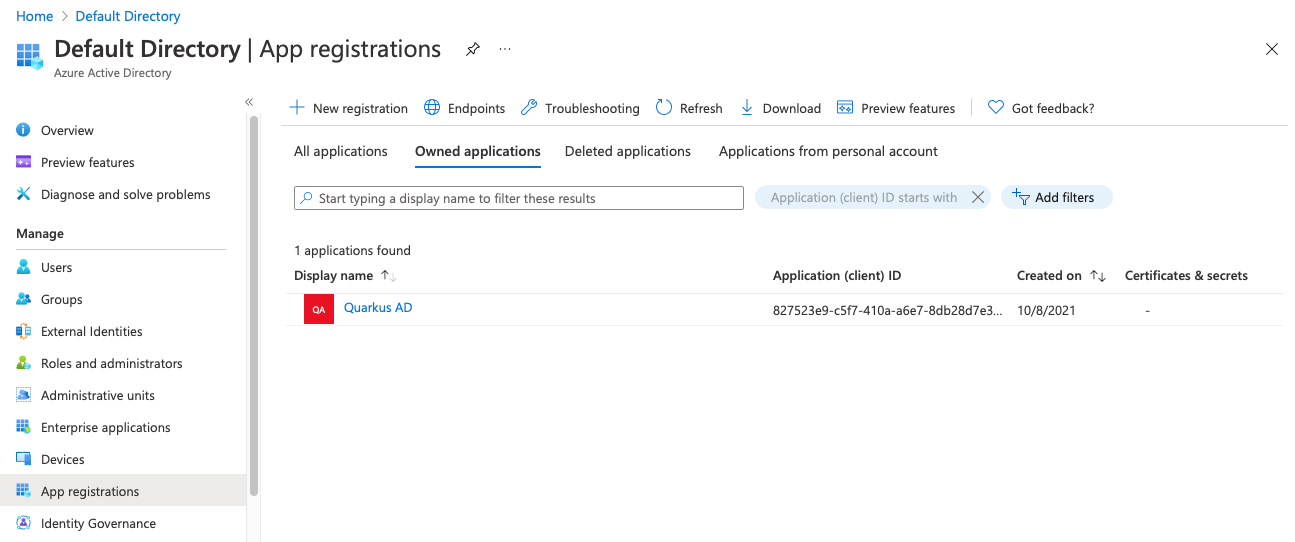
We can now find the parameters we need to set up Quarkus OIDC. Click on Quarkus AD to display its details:
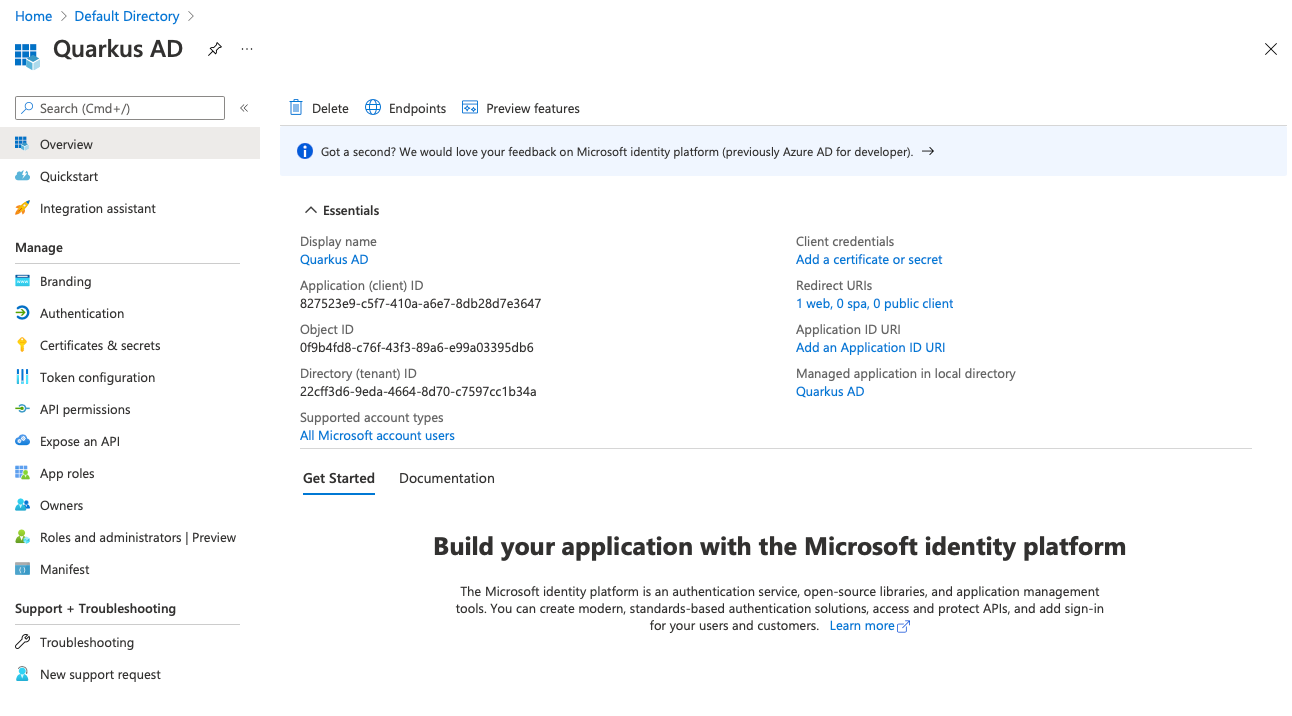
The first value we're looking for is the Application (client) ID. In our case, the value is 827523e9-c5f7-410a-a6e7-8db28d7e3647. Yours will be different.
Open application.properties and add the value for quarkus.oidc.client-id
1quarkus.oidc.client-id=827523e9-c5f7-410a-a6e7-8db28d7e3647
2quarkus.oidc.credentials.secret=<todo>
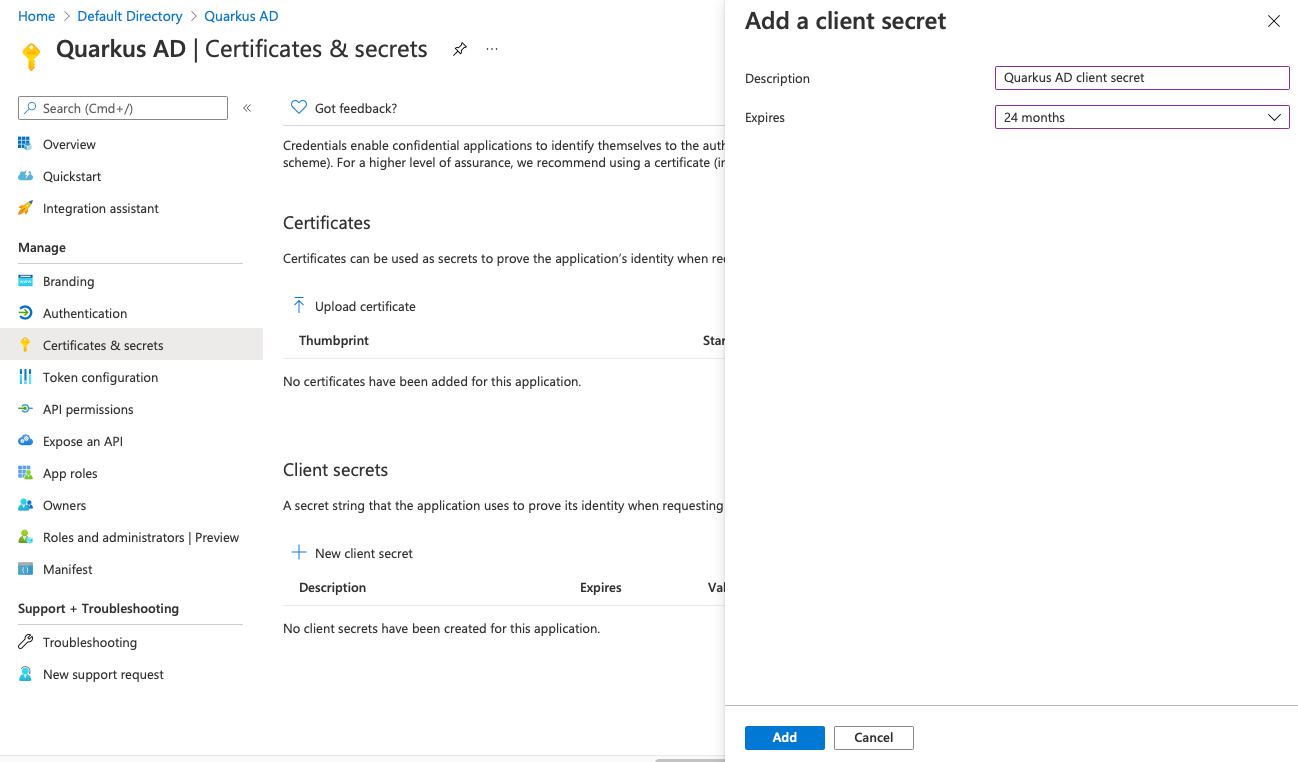
3quarkus.oidc.auth-server-url=<todo>Next, click Add a certificate or secret, and then New client secret. Name it Quarkus AD client secret and click Add.
You should then see it in the list of client secrets:
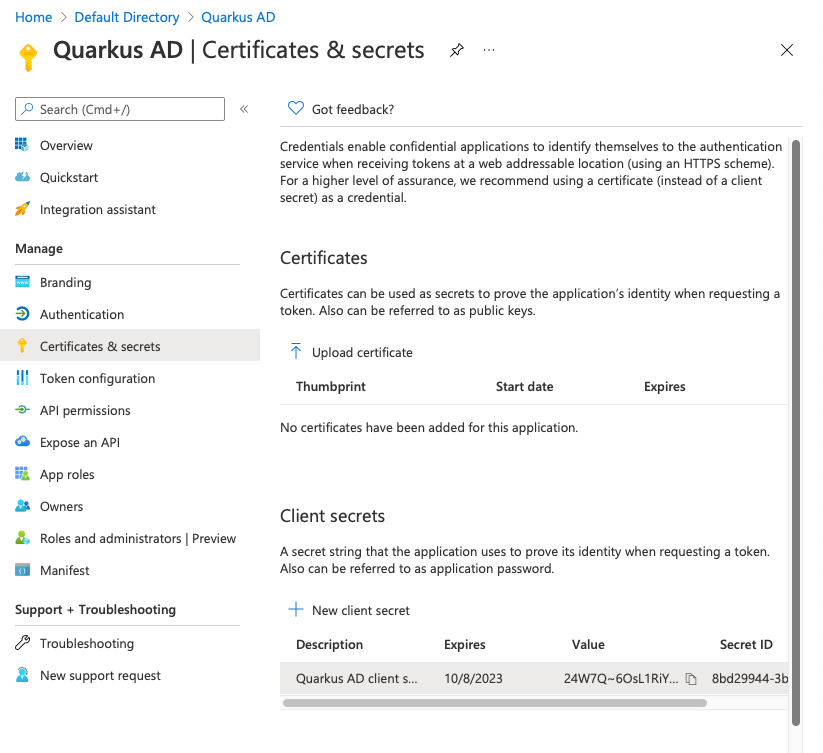
Copy the value (not the ID) to the clipboard using the small copy-button and set quarkus.oidc.credentials.secret to that value.
1quarkus.oidc.client-id=827523e9-c5f7-410a-a6e7-8db28d7e3647
2quarkus.oidc.credentials.secret=<todo>
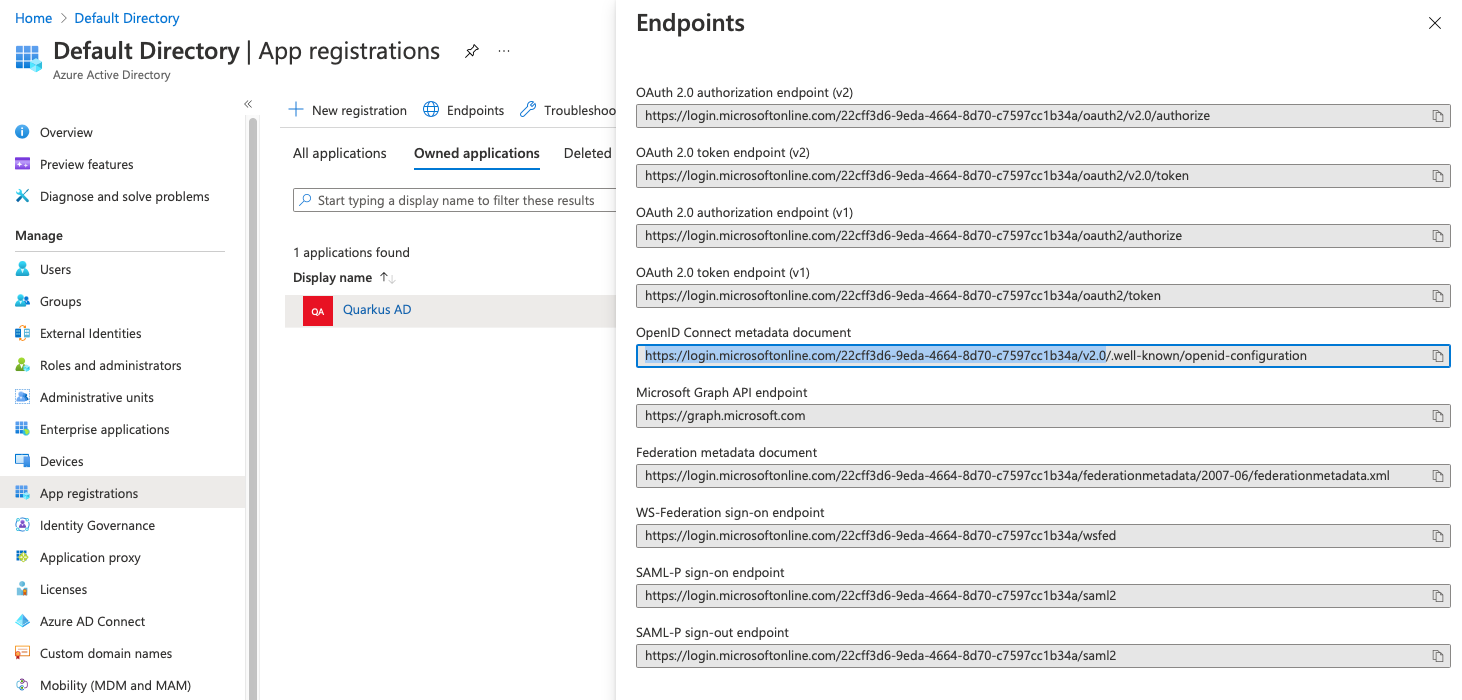
3quarkus.oidc.auth-server-url=<todo>The last property we need is the Auth Server URL. You'll find that by navigating to Manage/App registrations and selecting Endpoints. The value we need is "OpenID Connect Metadata document", but only the part up to and including v2.0. Quarkus will add .well-known, etc, itself.
Copy the value and set quarkus.oidc.auth-server-url in application.properties:
1quarkus.oidc.client-id=827523e9-c5f7-410a-a6e7-8db28d7e3647
2quarkus.oidc.credentials.secret=<not shown>
3quarkus.oidc.auth-server-url=https://login.microsoftonline.com/22cff3d6-9eda-4664-8d70-c7597cc1b34a/v2.0
Reload http://localhost:8080/some-page. In the console, you should see the application restarting, and a line that says that Quarkus is discovering the OpenID Connect configuration
12021-10-08 17:15:49,791 INFO [io.qua.oid.dep.dev.OidcDevConsoleProcessor] (build-5) OIDC Dev Console: discovering the provider metadata at https://login.microsoftonline.com/22cff3d6-9eda-4664-8d70-c7597cc1b34a/v2.0/.well-known/openid-configurationBefore we can enable authentication, we first need to set up the redirect URL. By default, Quarkus will ask Azure AD to redirect the user back to the URL they tried to access before authenticating. However, Azure AD only allows the application to redirect to a configured list of urls. While there is limited support for wildcards, the safest option is to simply redirect the user to an absolute url, and let Quarkus remember where the user wanted to go.
OIDC supports three different flows. These are called Authorization Code Flow, Implicit Flow and Hybrid Flow. These are mapped to the application types WEB-APP, SERVICE and HYBRID in Quarkus OIDC. The main difference between these flows is whether tokens are exposed to the client. In our case, we're developing a server-side rendered web app.
Add the following to application.properties:
1quarkus.oidc.application-type=web_app
2quarkus.oidc.authentication.redirect-path=/
3quarkus.oidc.authentication.restore-path-after-redirect=true
To force the user to log on, we need to enable authentication on the endpoint. In SomePage.java, add the @Authenticated annotation to the class. After Quarkus OIDC has authenticated the user, a SecurityIdentity is created. Since the page controller is request scoped, it is OK to inject the SecurityIdentity as an instance member. Make sure the page template also has access to the SecurityIdentity by adding it to the page data.
1@Path("/some-page")
2@Authenticated
3public class SomePage {
4    private final Template page;
5
6    @Inject
7    SecurityIdentity identity;
8
9    public SomePage(Template page) {
10        this.page = requireNonNull(page, "page is required");
11    }
12
13    @GET
14    @Produces(MediaType.TEXT_HTML)
15    public TemplateInstance get(@QueryParam("name") String name) {
16        return page
17                .data("name", name)
18                .data("identity", identity);
19    }
20}
You can then modify the html template to display the name of the user. In page.qute.html, add the following:
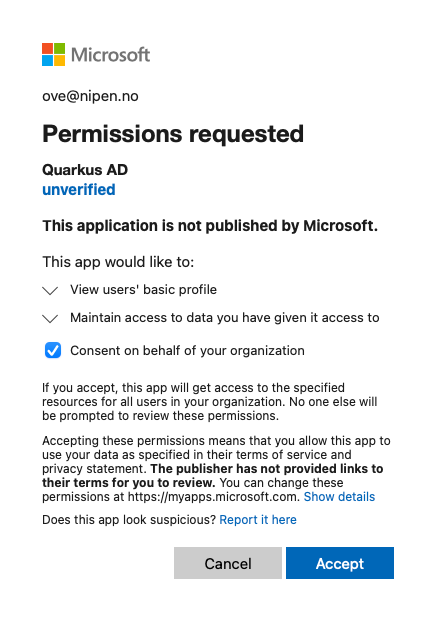
1<h1>Hello, {identity.principal.name}</h1>Finally, test it out by navigating to http://localhost:8080/some-page. You should be redirected to Azure AD and asked to log on. You may also be asked to consent to sharing your data with the application.
If all went well, you should see this page:

Debugging Quarkus OIDC
If all did not go well, you need a bit of debugging information. The first thing to do is to enable debug logging in the Quarkus OIDC plugin. Add the following to your application.properties:
1quarkus.log.category."io.quarkus.oidc".min-level=TRACE
2quarkus.log.category."io.quarkus.oidc".level=TRACE
You may also want to take a look at the actual JWT tokens received from Azure AD. One way to do it, is to intercept the SecurityIdentity creation process by implementing a SecurityIdentityAugmentor. I use it for logging the tokens as they are received, but you can also use it to add more information to the SecurityIdentity, for instance by querying a user database or parsing additional claims in the token.
1@ApplicationScoped
2public class TokenDebugger implements SecurityIdentityAugmentor {
3    private final ObjectMapper objectMapper = new ObjectMapper();
4
5    @Override
6    public Uni<SecurityIdentity> augment(SecurityIdentity securityIdentity, AuthenticationRequestContext authenticationRequestContext) {
7        if (securityIdentity.getPrincipal() instanceof JsonWebToken) {
8            JsonWebToken principal = (JsonWebToken) securityIdentity.getPrincipal();
9
10            System.out.println("Received token:");
11            for (String part : principal.getRawToken().split("\\.")) {
12                String decoded = new String(Base64.decode(part));
13                System.out.println(toPrettyJson(decoded));
14            }
15        }
16        return Uni.createFrom().item(securityIdentity);
17    }
18
19    private String toPrettyJson(String json) {
20        try {
21            Object value = objectMapper.readValue(json, Object.class);
22            return objectMapper.writerWithDefaultPrettyPrinter().writeValueAsString(value);
23        } catch (JsonProcessingException e) {
24            return "";
25        }
26    }
27}
If you add the TokenDebugger class to your project and refresh the page, you should see something like this on the console:
1Received token:
2{
3  "typ" : "JWT",
4  "alg" : "RS256",
5  "kid" : "l3sQ-50cCH4xBVZLHTGwnSR7680"
6}
7{
8  "aud" : "827523e9-c5f7-410a-a6e7-8db28d7e3647",
9  "iss" : "https://login.microsoftonline.com/22cff3d6-9eda-4664-8d70-c7597cc1b34a/v2.0",
10  "iat" : 1634285978,
11  "nbf" : 1634285978,
12  "exp" : 1634289878,
13  "email" : "ove@nipen.no",
14  "idp" : "https://sts.windows.net/9188040d-6c67-4c5b-b112-36a304b66dad/",
15  "oid" : "97882ea6-d318-4551-b2cc-eda11a176ad1",
16  "rh" : "0.AS8A1vPPItqeZEaNcMdZfMGzSukjdYL3xQpBpueNso1-NkcvAHc.",
17  "sub" : "M-ffvMjipQMfYs6nLepEHPTIlUTTqIkXofB3rTIMpmY",
18  "tid" : "22cff3d6-9eda-4664-8d70-c7597cc1b34a",
19  "uti" : "x2m26gilS0OnFhZN4OowAA",
20  "ver" : "2.0"
21}
Requesting more information from Active Directory
Looking at the ID token we received above, we can see that the only information we get about the user is the email address and a few IDs. Our application can ask for more information from the ID provider (in this case, Azure AD) by modifying the scope parameter sent during login.
By default, Quarkus OIDC requests the openid scope from AD, but there are more scopes available in all OIDC implementations, and you can add custom scopes in most ID providers. For now, we'll ask for the three standard scopes, openid, profile and email. By asking for profile, we'll get basic profile information such as the user's name.
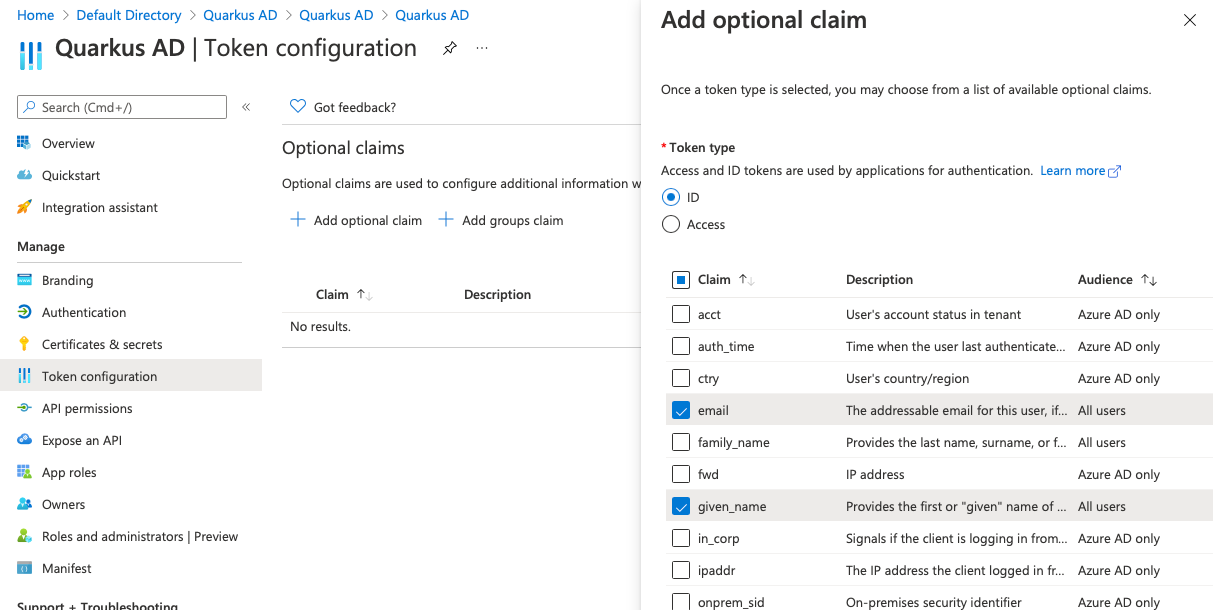
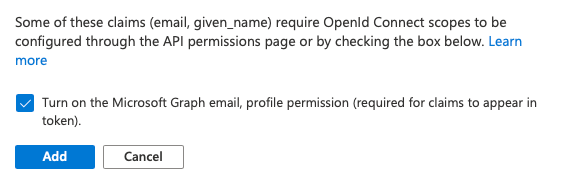
On the ID provider side of things, we'll need to configure which information to allow the application to ask for. In Azure AD, navigate to App registrations > Quarkus AD > Token configuration and click Add optional claim. We want to add email, given_name, and family name to the ID token.
You may be asked to turn on the Microsoft Graph permissions. If so, you need to accept.
To make Quarkus OIDC ask for the profile and email scopes, we need to add the following to application.properties. Note that the openid scope is always requested, so we don't need to specify it explicitly.
1quarkus.oidc.authentication.scopes=profile emailReload http://localhost:8080/some-page, and you should see something resembling this in the logs:
1Received token:
2{
3  "typ" : "JWT",
4  "alg" : "RS256",
5  "kid" : "l3sQ-50cCH4xBVZLHTGwnSR7680"
6}
7{
8  "aud" : "827523e9-c5f7-410a-a6e7-8db28d7e3647",
9  "iss" : "https://login.microsoftonline.com/22cff3d6-9eda-4664-8d70-c7597cc1b34a/v2.0",
10  "iat" : 1634299970,
11  "nbf" : 1634299970,
12  "exp" : 1634303870,
13  "email" : "ove@nipen.no",
14  "family_name" : "Nipen",
15  "given_name" : "Ove",
16  "idp" : "https://sts.windows.net/9188040d-6c67-4c5b-b112-36a304b66dad/",
17  "name" : "Ove Nipen",
18  "oid" : "97882ea6-d318-4551-b2cc-eda11a176ad1",
19  "preferred_username" : "ove@nipen.no",
20  "rh" : "0.AS8A1vPPItqeZEaNcMdZfMGzSukjdYL3xQpBpueNso1-NkcvAHc.",
21  "sub" : "M-ffvMjipQMfYs6nLepEHPTIlUTTqIkXofB3rTIMpmY",
22  "tid" : "22cff3d6-9eda-4664-8d70-c7597cc1b34a",
23  "uti" : "UuaRzT-VPUyGgNodlWIzAA",
24  "ver" : "2.0"
25}
You can then add some more info to the html page:
1<h1>Hello, {identity.principal.name}</h1>
2<p>
3    Given Name: {identity.principal.getClaim("given_name")}
4</p>
Role-Based Access Control
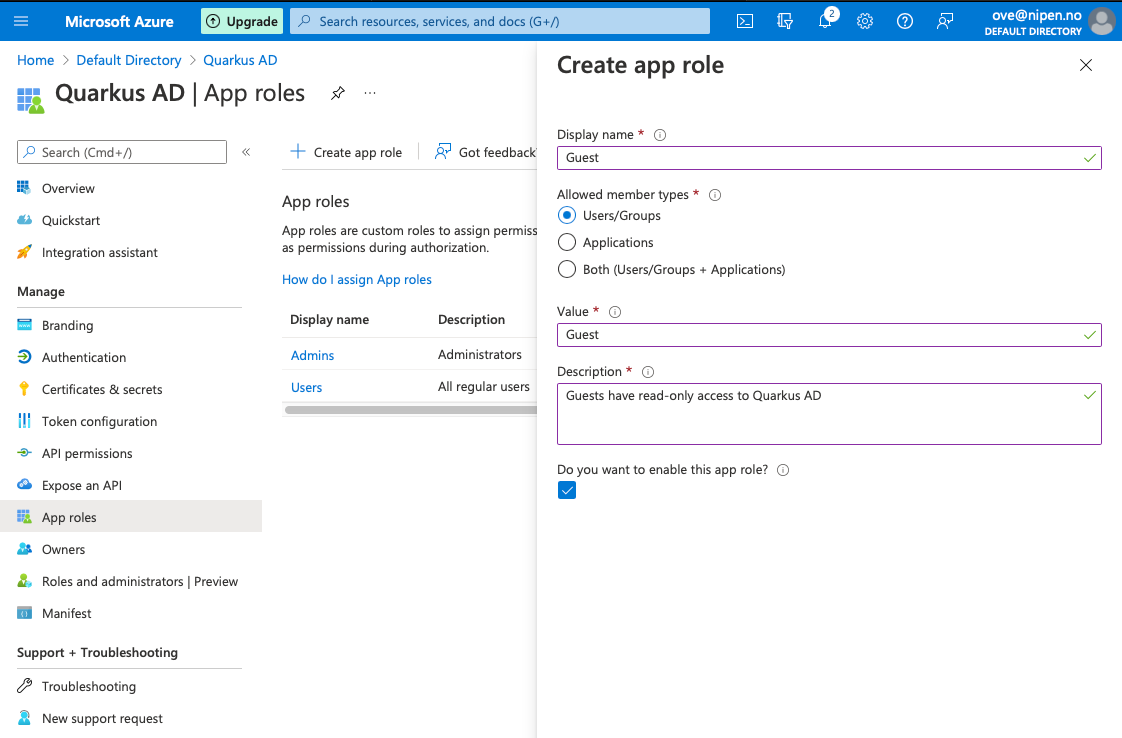
Now that we know the user's identity, we can decide what they're allowed to do. To set up roles for your application, navigate to Manage > App registrations > Quarkus AD > App roles and create a new app role.
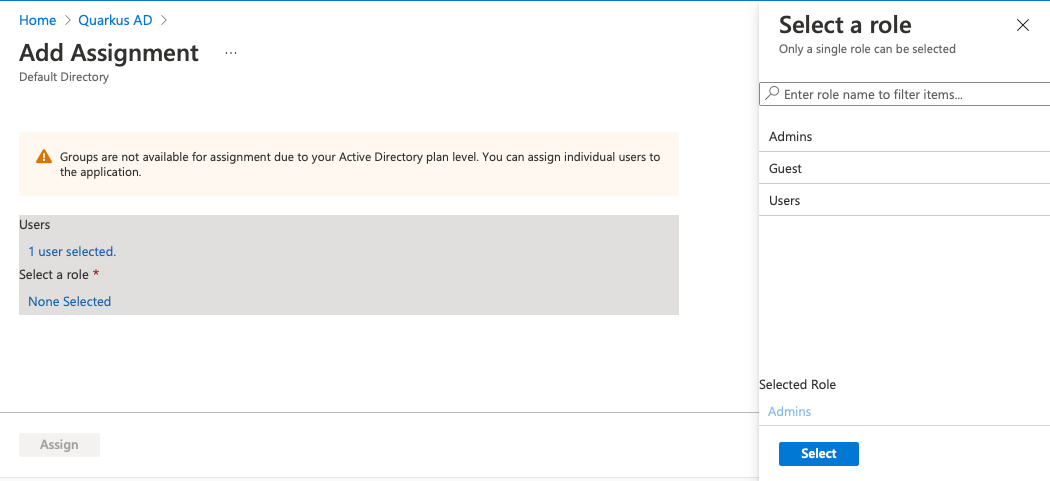
To assign roles to users, navigate to Manage > Enterprise Applications > Quarkus AD > Users and groups. Then click Add user/group. Select the users you want to assign a role, and select one role to assign.
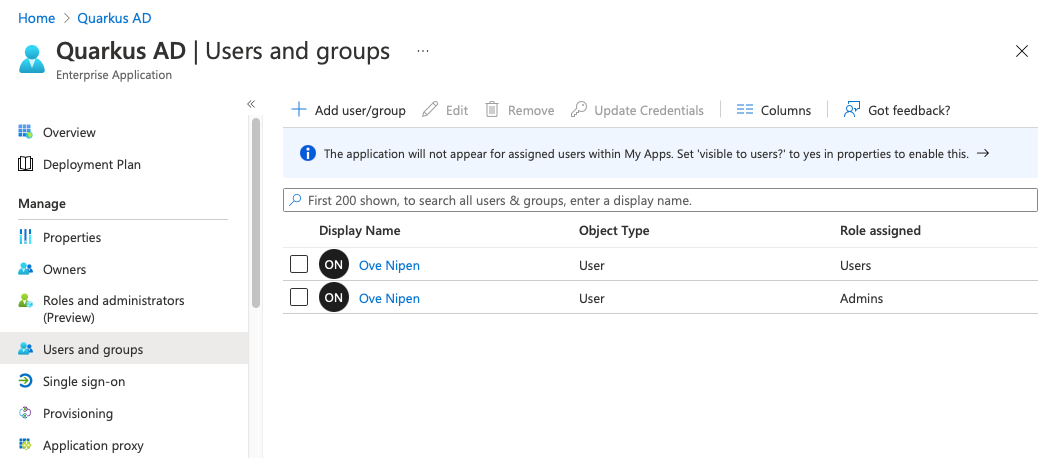
You should see your assigned roles on the Users and roles screen afterwards.
If you log out and log back in, you should see that your token has been updated with the newly assigned roles:
1Received token:
2{
3 "typ" : "JWT",
4 "alg" : "RS256",
5 "kid" : "l3sQ-50cCH4xBVZLHTGwnSR7680"
6}
7{
8 "aud" : "827523e9-c5f7-410a-a6e7-8db28d7e3647",
9 "iss" : "https://login.microsoftonline.com/22cff3d6-9eda-4664-8d70-c7597cc1b34a/v2.0",
10 "iat" : 1636023670,
11 "nbf" : 1636023670,
12 "exp" : 1636027570,
13 "email" : "ove@nipen.no",
14 "family_name" : "Nipen",
15 "given_name" : "Ove",
16 "idp" : "https://sts.windows.net/9188040d-6c67-4c5b-b112-36a304b66dad/",
17 "name" : "Ove Nipen",
18 "oid" : "97882ea6-d318-4551-b2cc-eda11a176ad1",
19 "preferred_username" : "ove@nipen.no",
20 "rh" : "0.AS8A1vPPItqeZEaNcMdZfMGzSukjdYL3xQpBpueNso1-NkcvAHc.",
21 "roles" : [ "admin", "users" ],
22 "sub" : "M-ffvMjipQMfYs6nLepEHPTIlUTTqIkXofB3rTIMpmY",
23 "tid" : "22cff3d6-9eda-4664-8d70-c7597cc1b34a",
24 "uti" : "eGIjNwQa4UOP9wU2dUwmAA",
25 "ver" : "2.0"
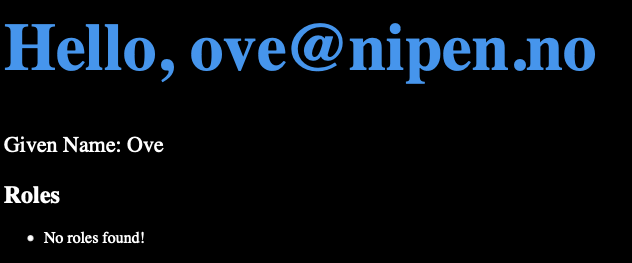
26}Let's try to display the roles on page.qute.html:
1<body>
2<h1>Hello, {identity.principal.name}</h1>
3<p>
4    Given Name: {identity.principal.getClaim("given_name")}
5</p>
6
7<h2>Roles</h2>
8<ul>
9    {#if identity.roles}
10        {#for role in identity.roles}
11            <li>{role}</li>
12        {/for}
13    {#else}
14        <li>No roles found!</li>
15    {/if}
16</ul>
17</body>
18</html>
Unfortunately, Quarkus cannot see any roles.
By default, Quarkus OIDC looks for roles in a claim called /groups. As we can see, Azure AD uses a claim called /roles. This can be configured by setting the following property in application.properties:
1quarkus.oidc.roles.role-claim-path=roles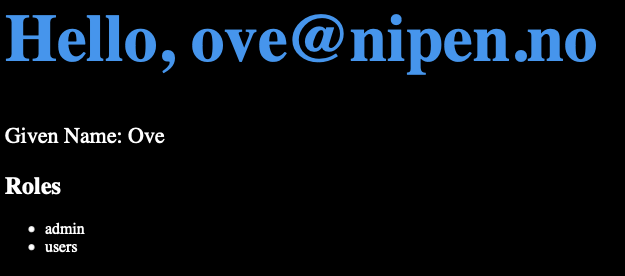
Now that we know the user's identity and their roles, we can finally use it for controlling access to our services. For a simple (but heavy handed) approach, you can annotate a resource with @RolesAllowed. Any users not in the listed roles will receive a 403 Forbidden reply.
Replace the @Authenticated annotation in SomePage.java with @RolesAllowed("admin") and refresh the page. Then experiment with requiring other roles that your user does not have, and you should get a blank page and the HTTP status 403 Forbidden.
1@Path("/some-page")
2@RolesAllowed("admin")
3public class SomePage {
4 private final Template page;
5
6 @Inject
7 SecurityIdentity identity;
8
9 ...
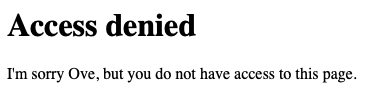
10}For a more refined approach, you can use identity.hasRole(...) to display a more user-friendly page if the user does not have access.
SomePage.java:
1@Path("/some-page")
2@Authenticated
3public class SomePage {
4private final Template page;
5private final Template forbidden;
6
7    @Inject
8    SecurityIdentity identity;
9
10    public SomePage(Template page, Template forbidden) {
11        this.page = requireNonNull(page, "page is required");
12        this.forbidden = requireNonNull(forbidden, "page is required");
13    }
14
15    @GET
16    @Produces(MediaType.TEXT_HTML)
17    public TemplateInstance get(@QueryParam("name") String name) {
18        if (identity.hasRole("root")) {
19            return page
20                    .data("name", name)
21                    .data("identity", identity);
22        } else {
23            return forbidden
24                    .data("identity", identity);
25        }
26    }
27}src/main/resources/templates/forbidden.qute.html:
1<h1>Access denied</h1>
2
3<p>
4    I'm sorry {identity.principal.getClaim("given_name")}, but you do not have access to this page.
5</p>
Then reload the page, and you should see something similar to this:
Further reading
We've shown how to configure Azure AD and Quarkus OIDC to enable Role-based Access Control in your Quarkus apps. For more information about securing your Quarkus app, check out https://quarkus.io/guides/#security
Happy hacking!